

One of my favorite aspects of vaporizing is the flavor. I am a huge flavor snob, I prioritize flavor in my experience and it’s one of the primary reasons that I vaporize instead of combusting. Today I want to give you my top three tips for enhancing and maximizing the flavor of your session, but there’s one thing to keep in mind above all else - quality in, quality out. If you have flower that doesn’t smell nice, there’s very little chance that it’s going to taste nice.
Tip One - Storage Containers
How you store your flower is important. If you go and get some 10/10 chronic, and then you just leave it out on the coffee table overnight, the vast majority of the flavor is going to disappear, and it’ll be harsh when you vaporize it. The terpenes on flower will evaporate and dissipate into the environment. The trichomes can also get brittle, meaning that it’s way easier for them to break off the flower and be lost. To counteract these problems you should make sure to store your flower in a good container which will protect it for the long term.
The container should be airtight, or at least really close to it, and you also want to make sure that the flower isn’t going to be exposed to UV light. If you are going to be keeping your container somewhere dark, then a mason jar is a great option since they are completely airtight. Otherwise, an opaque container that will keep light out is a good idea. I’ve noticed that the containers I buy my legal flower in have been getting way better, some are opaque glass jars with a gasket, anything like this would be absolutely fine to keep your flower in while you are using it.
Flower should be kept at a consistently cool temperature. I wouldn’t advise keeping it in the freezer or even the fridge, but you also don’t want to keep it anywhere it’s going to get hot, especially if it’s in direct sunlight. At the end of the day it’s like storing almost anything meant for consumption - store it in a cool, dark, dry place for best results.
The containers that I use for my day-to-day purposes are from the Jyarz lineup. Jyarz are straightforward, infinitely reusable, glass-lined, waterproof travel containers. Each Jyarz model consists of four main parts, and it starts with the exterior protective sleeve that surrounds the glass insert. The sleeve is made from 100% recycled milk jug plastic, which is pretty great. There’s no BPA‘s or anything like that in the plastic, it’s clean, and you can even recycle it again if you want. Then you have the cap, which is made from the same material as the sleeve and securely screws into place on top. Next you have the part that I think really sets these containers apart, the glass insert. These are made from borosilicate glass, which means they are strong and super easy to restore to a brand new level of cleanness with isopropyl alcohol. Finally you have two gaskets that are made from high purity, FDA food-safe latex. Latex isn’t going to add any flavor to your material, and it provides an airtight seal that will preserve your flower for the long term.

Jyarz come in four different sizes. The smallest is the Chico, it has a rounded bottom and quite a low capacity. I would only bring ground flower or kief in this one and it holds a decent amount for a day session.
The bigger brother to the Chico is the Classic, this is quite popular and is the perfect size for a day out because it’s easily portable, but you can still fit around 3g of flower inside without having to squish it in there.
The next size up is the Satchmo, this is my main container that I use at home. It fits significantly more than the Classic, I only ever put an eighth in there at a time, but I estimate that you could probably fit 7g in there if you want.
Finally, you have the Big Papi, this is the largest model they offer, and this is a great option for people who grow or buy in large quantities. I don’t know the full capacity as I don’t ever have that much on me, but an eighth doesn’t take up much room in it at all.
Whichever size you choose, these things are great as you get to store your flower in glass which is definitely what I prefer, and the super protective outer layer not only blocks light and air infiltration, but also keeps the glass safe. They should last you forever as long as you don’t break the glass, I’m still using the original models that I’ve had for the last five years or so, and they work just as well now as they did when they were brand new.
Tip Two - Humidity Control
Once you’ve got your storage sorted out, the next thing you’ll want to do is ensure that your flower is being kept at an ideal humidity level. Usually when you receive your flower it should be at a nice humidity level already, not super dried out or feeling moist, we just want to maintain that level. Even in an airtight container your flower is still going to lose some humidity over time, it’s just a natural process. Any time your flower is drying out, some terpenes will be evaporating, and terpenes aren’t responsible only for the flavor, but they also have a real impact on the effects, helping make one strain very different from another, so you want to preserve them.

There are a number of methods you can use to rehydrate dry flower, a classic one is putting an orange peel inside your container or baggie for a while, but there’s no way to control the humidity it will add, so it’s easy to over or under do it. My favorite way of keeping flower at a good humidity level is to use Boveda packs. These contain only salt and water so it's a natural solution, there’s no unhealthy/weird science going on in there. Whenever I buy high-quality flower it will have one of these in there because Boveda packs are not really for rehydrating flower, but they will maintain a consistent humidity level.
Using one of these packs in your flower container is going to make a night and day difference in terms of retaining the flavor and strength of your flower, especially over the long term. You can get them in massive sizes or in really small sizes, but it’s best to try to buy the proper sized pack for your storage container. They are also available in different humidity levels, the 62% pack for example will keep your flower at 62% relative humidity + or -2%. If you put flower that is at 55% humidity into a container, and then you put in one of these humidity packs, it will raise the humidity of the flower to 62%. If you put in some wet flower that is at 70% humidity, then the Boveda pack will absorb moisture from that flower to bring it down to 62%.

Generally it is recommended that flower be stored at somewhere between 55% and 65% humidity, I prefer to keep it at 62%, as I find I get more flavor at that level, but 58% seems to vape a little better, so try both and see which you like better. If you put very consistently humidified flower into your container, one of these packs can last a super long time because it won’t have much work to do to add or subtract humidity. If you put in some super dry flower, eventually all of the moisture in the Boveda pack will be utilized, the pack will get hard and crinkly, and then it’s time to dispose of it.
There’s another popular brand of humidity pack called the Integra Boost, which is pretty much an identical product, but it uses a glycerine and water solution instead of salt and water. If you check out the websites of both companies they seem to throw subtle shade at the opposing system, suggesting that theirs is superior, but I have used both extensively and I find them to be pretty much interchangeable.
Tip Three - Vaporization Method
When you’ve got your flower in a proper storage container, with a humidity management system in place, how you use your flower is the final step towards attaining the best possible flavor. I don’t have to tell you guys that the relatively low temperatures of vaporizing compared to combustion means that you actually get to appreciate the taste of your flower instead of just tasting ash, but it really is amazing how the flavor of vapour can exactly mimic the smell of your herb when you properly vape it.
My first tip for maximum flavor is to use a full convection device, or at least one that is close to full convection. With a conduction vape you only get direct heat applied to the material that is touching the surface of the bowl, and then heat radiates through the flower to the center. This can lead to uneven vaporization, with the outer flower receiving too much heat and the inner flower not getting enough. With a convection vaporizer you are simply passing heated air through your material, evaporating all of the active ingredients and terpenes, which you then inhale. This produces much more even and controlled vaporization, no terpene loss or dead spots in the center.

I also recommend that you use a fresh bowl of flower as often as you can. When you use a device with a large bowl where you are doing multiple sessions or just multiple huge hits before you’re cashing it, the terpene evaporation is not going to be even throughout the hits. It’s going to be very front loaded, meaning that you’re going to extract all the good flavor in your first hit or two, and then it’s going to very quickly die off from there. Using a device with a small bowl, like a DynaVap with a Half-Bowl Converter, or the Fury 2 Water Pipe Adapter, helps with this. You’ll only do one or two hits per bowl and replace your flower so often that you’re constantly getting fresh flavor hits.
Finally, you want to make sure that your temperature selection is geared more towards flavor than vapour production. There’s always a happy medium where you get great flavor and vapour production that you’re happy with, but you will always achieve better flavor towards the lower end of the temperature spectrum. Some people vape at crazy low temperatures like 250°F, and you will get some psychoactive or medicinal benefits at temperatures this low. I would say that for more traditional sessions around 340°F is the lowest temperature I would use, anything below that just feels like ‘diet vaping’ to me, I need more meat on the bones! Once you go above 370°F you are chasing vapour more than flavor, but this is going to vary from device to device and even strain to strain, so use this as a general guideline and then enjoy the wonderful process of experimentation.
Refreshing the bowl more often gives me better overall effects as well and I find that it is a cleaner sort of experience with fresh flower, whereas coming back for the fourth session just makes me feel tired. Also, the higher the temperature, the more sedative I find the effects, so I recommend experimenting with a few really low temperature sessions, as sometimes the results can be surprising.
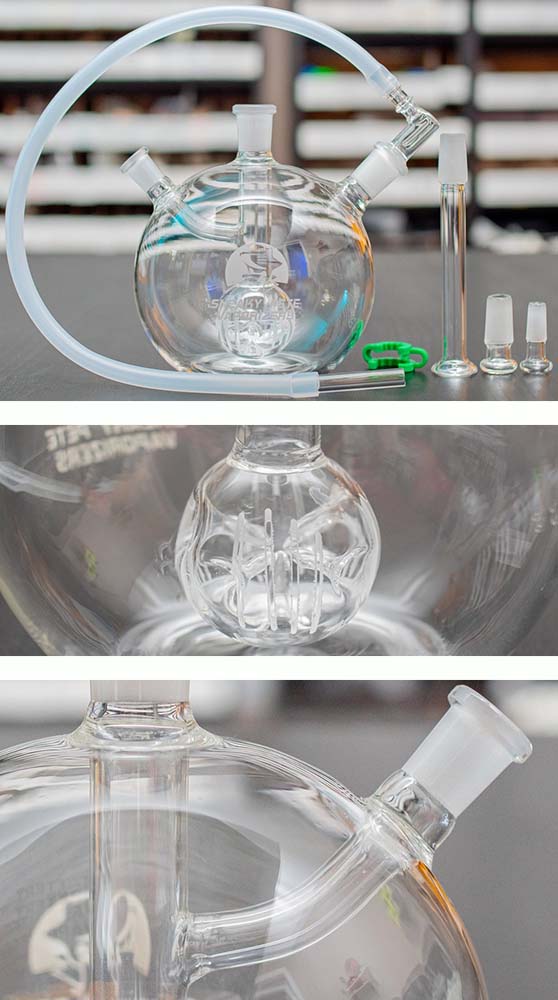
Mega Globe Mk 2 Reveal
The Mega Globe is our most popular water pipe. People love it for the unrestricted airflow, the wide stable base, and the large water volume. I feel most importantly that the capacity is perfect for any vape - not too big, not too small, just right.
Meet the Mega Globe Mk 2. It retains everything you loved about the OG Mega Globe while adding improvements to the radical new design. At the top it has the same ever-popular 14mm female joint, if you follow it down the stem you’ll reach the first major change - the new 3D Sphere Percolator. The visually stunning new sphere shape with large internal nipple indentations effectively disrupts the vapour flowing through it, feeding out into the incredibly free airflow the percolator offers. I prefer water pipes that have nice free airflow, as a lot of vapes already add some resistance, so you don’t want your water pipe adding even more.
Our Pass-Through Adapter is a very popular companion piece to the Mega Globe, it’s super useful for adding a 10 mm female joint and functioning as a carb hole. We’ve taken that concept and made it a built-in feature, a newly added 10mm female joint which feeds directly into the downstem. This boosts the versatility of the Mega Globe Mk 2, allowing you to use it with 10mm or 14mm vaporizer connections, you can even do both at the same time if you’re feeling really wild! The 10mm joint also works as a shotgun or carb, this means you don’t need to awkwardly take the vape off of the Globe to clear it like you did with the previous model. Even if you never use the 10mm joint to connect a vape, this carb feature alone makes a huge improvement, and it’s great to have this ability without the need for any additional adapters.
The Mega Globe Mk 2 comes with a whip and a glass mouthpiece, giving you the option to use it whichever way you prefer, and a Keck Clip for securely attaching your mouthpiece of choice to the Globe body. It also includes two glass stoppers (10mm and 14mm, one for each joint) so you can close either joint when it’s not in use, no need to use your finger.
Overall, it’s a super comprehensive kit and a highly functional upgrade that will improve every session, no matter what sort of device you are using.
Conclusion
So there you go guys, I hope you enjoyed my top three tips to get the best flavor out of your session. There’s some amazing flower out there these days, and I think it’s absolutely worthwhile to preserve and maintain the integrity of your flower as best as you possibly can.
I also hope you enjoyed checking out the new Mega Globe Mk 2, I’m super excited about this one, it’s been my most used piece for a few weeks now. I find the second joint so handy, even if I’m not using a 10mm vape the carb function is so useful, and I especially love kicking it up a level by adding a second vape. Thank you so much for reading and watching, see you again next time.
Keep it green, keep it sneaky!
Mega Globe Mk 2™

BEST PRICE GUARANTEED
Shop nowFree shipping for orders over $60 within the USA. Fast, low-cost and discrete shipping.